Whether you are new to mountain biking or a professional biker, taking care of your mountain bike isn’t just about ticking a checklist. It’s also about dedicating an adequate amount of time and effort to inspect, clean, and maintain the good condition of your mountain bike.
Although Mountain Bike Maintenance (MTB Maintenance) is a fairly straightforward process, it’s quite easy to miss a few steps. For such scenarios, this article will help you remember the entire process in an orderly manner.
Keep reading further to learn about step-by-step tutorials on how to maintain your mountain bike. Let’s get started!
Pre-Ride Inspection of Mountain Bike
We have all heard the famous phrase “Prevention is better than Cure”. It applies to everything, even mountain bikes. Knowing how to ride a bicycle isn’t enough, you have to make sure your bike is functioning properly before riding a bike to avoid any unfortunate circumstances.
To inspect your bike properly, you need to do the M-check. It consists of 6 inspection steps. Each step involves checking the bike’s condition in the fastest way possible. Let’s have a look at it.
6 steps for pre-ride inspection of a mountain bike
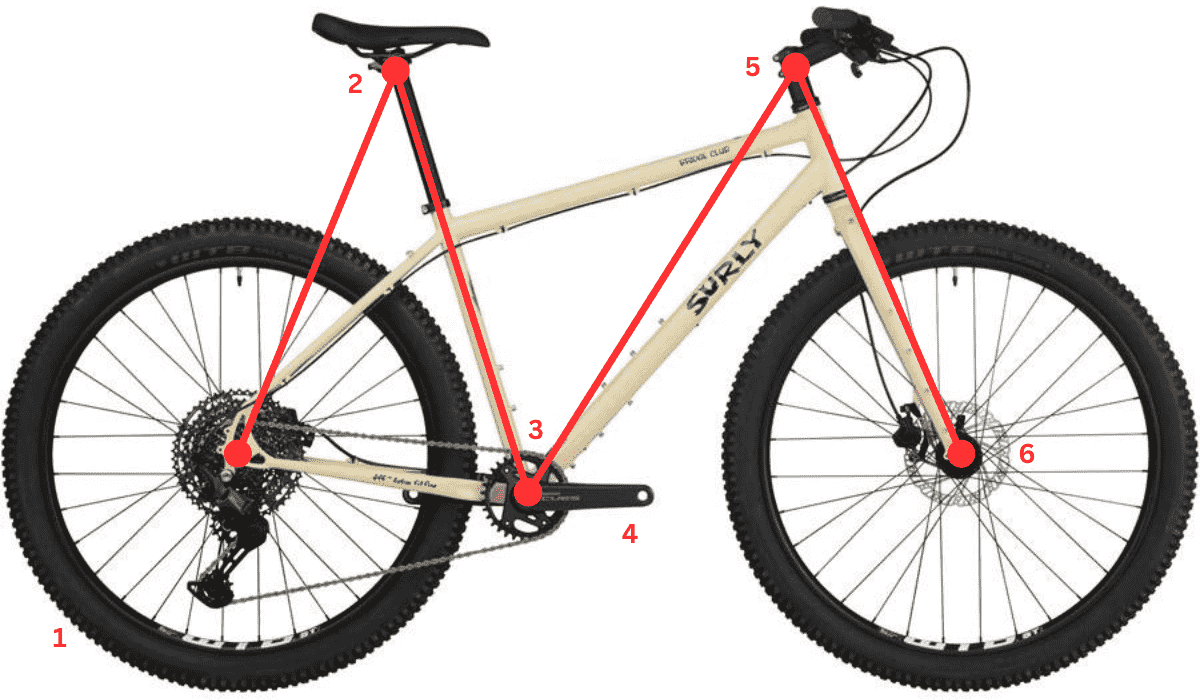
Step 1: Check the wheels
First, you should ensure your tires have the recommended air pressure using a tire pressure gauge. Even if you don’t have a gauge, use the air pump to check and inflate the tire. Normally, you need 36 PSI for a mountain bike rider weighing 70 kg. Add 1 PSI for every 5 kg over 70kg.
Also, look for any cuts, tears, or punctures in the tires. Make sure your wheels are tightly fitted to the bike without any movement in the axle.
Step 2: Check the seat or saddle
Secondly, you need to ensure your saddle isn’t wobbly by giving it a gentle shake from side to side. If it feels loose, grab your allen keys and snug up the bolts holding the seat in place. And if you’ve got one of those fancy dropper seat posts, give it a test run to make sure it moves up and down smoothly.
Step 3: Check the bike chain
Thirdly, you need to take a peek at your chain to make sure it’s clean, nicely oiled, and rust-free. If it’s looking grungy, it’s time to break out the cleaning supplies. Be careful not to go overboard with the oil—too much will just make a mess. Once you’ve given it a good scrub and let it dry, your bike will be ready to zoom!
One more thing, look at the signs of chain wear. When your mountain bike chain starts to wear out, it starts stretching. You will notice your chain is slightly loose. If you are not sure, you can ask a mechanic.
Step 4: Check the pedal
Check if you notice your pedals are wobbling from side to side or feeling a bit stiff when you spin them, it could mean you need to adjust the screw in your pedals according to your needs.
Step 5: Check the handlebars
Make sure your handlebars are nice tight and perfectly straight. You can do a quick check by gripping the front wheel with your knees and trying to turn the handlebars. They shouldn’t budge. If they do, give those bolts a little extra twist. Also, make sure your handlebars are lined up straight by looking down on them from above the forks.
Step 6: Check the brakes
Walk your bike beside you at a slow pace and test each brake separately. When you gently squeeze the left (rear) brake lever, the rear wheel should come to a stop. Similarly, when you squeeze the right (front) brake lever, the bike should halt smoothly.
If either brake lever pulls all the way to the handlebar without engaging the brake fully, it’s a sign that maintenance is needed. Also, make sure the brake caliper is not wobbling from its position.
Cleaning and Lubricating Mountain Bike
Pre-ride inspection is just the first step in maintaining a smooth bike cycle. If you want to maintain the performance in the long run and prolong the lifespan of your mountain bike, you need to regularly clean and lubricate your bike. Here’s a step-by-step guide on how to do it effectively.
6 Steps to Clean and Lubricate a mountain bike
Required Materials:
- Water
- Mild detergent or bike-specific cleaner
- Soft-bristled brush or sponge
- Clean rags or towels
- Chain lubricant
- Bike stand (optional but helpful)
Step 1: Prepare Your Cleaning Area
You need a suitable location to clean your bike, preferably outdoors (garden, back of your house, or any open space) to avoid making a mess indoors. If you’ve got a bike stand, awesome, but if not, just lean your bike against something steady.
Step 2:Remove Dirt and Debris
Splash water on your bike. Use a bit of soap or a bike cleaner to cleanse your bike. Hit all the dirty spots—chain, gears, frame, wheels—like you’re giving it a mini shower.
Step 3: Scrubbing
Take your soft-bristled brush or sponge and start scrubbing away the grime and stubborn dirt. Don’t be shy, but also don’t go Hulk-smash on it. Gently scrub those parts nice and clean.
Step 4: Rinse and repeat
Once you’ve scrubbed your mountain bike, rinse off all that soap and dirt with more water. Make sure it’s all gone, or your bike will feel sticky later.
Step 5: Dry your Bike
Grab your towels and start drying off your bike. Get into all the nooks and crannies, especially places where water likes to hide.
Step 6: Lubrication
Time to show your chain some love. Apply chain lubricant to the chain and other moving parts. Spin the pedals backward to ensure it gets everywhere it needs to go. Wipe off any excess so it doesn’t attract more dirt.
Additional Mountain Bike Maintenance Tips
Typically, the pre-ride inspection and regular cleaning and lubricating of your mountain bike are enough to keep your ride in top shape. But there are some more areas beyond the typical maintenance tasks that you need to do on your routine checklist to maintain your bike.
Let’s have a look.
1. Mountain Bike Suspension Setup
Every mountain bike has suspension to maintain your control in rugged and difficult terrains. But not all-terrain requires the same suspension level. You need to adjust the adequate suspension settings according to the terrain type you are going to ride on.
Remember the suspension setup also varies depending on what type of mountain bike you have. It also depends on whether you have a front-only suspension bike or both front-rear suspension bikes.
2. Mountain Bike Frame Inspection
A frame is the backbone of a mountain bike that holds all the parts of the bike together. If anything happens to it, it can compromise your mountain bike’s overall structure integrity. This can be catastrophic.
So, you need to routinely check the frame of your bike after every ride. You need to thoroughly look for dents, cracks, or any kind of damage that could ruin your mountain biking experience. Also, make sure your frame is holding every moving part properly without any loose ends or wobble.
In case you find any problems with the frame, immediately go to a mechanic for repair. If it’s not repairable, you need to buy a new mountain bike frame to replace your old one.
3. Mountain Bike Cable Replacement
Cables are like the nerves of your mountain bike. They connect the derailleurs of your mountain bike to the shifters. It also connects the brake calipers to the brake levers. That means the cables play a key role in your bike’s movement.
These mountain bike cables over some time can fray, stretch, or break. This could compromise the performance of braking and shifting. Therefore, you need to routinely check your cables and replace them immediately if you see any damage.
4. Mountain Bike Bearing Check
If there are any problems with bearings, you won’t be able to roll, steer, or pedal your mountain bike. A good bearing has a quiet sound and feels smooth while riding a mountain bike in any terrain. But when the bearing has issues, it sounds like grinding or scraping.
You can put lubricants in mountain bike bearings but they are tricky. If you don’t know how to fix bearings, it’s better to call a mechanic rather than try to fix yourself. Normally, you may need to replace them with a new one.
6. Mountain Bike Handlebar Grips and Tape
Every rider needs a handlebar grip or tape to provide a good grip on the handles and reduce the overall ground vibrations while riding a mountain bike. This makes riding easier.
You need to check your bike grips or tape for any wear or tear. If there is any issue then they may compromise the controls of the mountain bike and cause hand fatigue. You need to immediately replace them to maintain a proper grip and smooth riding experience.
7. Regular Bike Fit Checks
Regularly checking the fit of your mountain bike is super important to make sure your rides are comfy and safe. Start by setting your saddle height just right so your legs aren’t too straight or too bent when you pedal.
Then, adjust the saddle position to make sure you’re not slipping forward. Also, you need to find that sweet spot on the handlebars where you’re not straining your back or shoulders. Ensure you can reach the brakes and shifters comfortably.
Don’t forget to tweak your suspension to match your weight and the trails you’re riding. Lastly, take your bike for a spin and see how it feels – if anything’s off, make some tweaks until it’s just right.
Essential Mountain Bike Tools You Need At Home
We have talked so much about mountain bike maintenance. While doing so, we have come across many tools that you may need to perform basic maintenance. It’s not compulsory to buy them. You can always go to a mechanic.
But having a few tools in your emergency repair kit can do no harm. You can get only the tools you need or buy a mountain bike tool kit set. This way you won’t have to spend dollars on your mechanic every single time to fix issues that you can easily fix yourself.
Here is a list of some essential tools that you get to repair your mountain bike.
1. Bike Stand
One of the main things you need while maintaining your bike is a Bike stand. It allows you to elevate your mountain bike off the ground and keep the bike stable. This helps you to clean, repair, and adjust mountain bike components without any trouble. You can get wall-mounted stands, floor stands, or portable stands. Choose the one that suits your house space.
2. Allen Keys
Allen keys are like the Swiss Army knives for your mountain bike’s nut and bolt. You can get them in sets of different sizes. They help you to tighten or loosen all the bolts of your bike. You will be able to adjust your brakes, handlebars, pedals, etc. as per your preferences. They’re small, but they pack a big punch when it comes to bike maintenance.
3. Floor pump
A floor pump is your go-to tool for keeping your mountain bike tires properly inflated. It’s like a heavy-duty air pump that sits on the floor, making it easy to use. With its long hose and sturdy base, it delivers high volumes of air with each pump, quickly filling your tires to the optimal pressure.
4. Screwdrivers
Screwdrivers are the handy helpers of your toolkit to tighten or loosen screws on your mountain bike. From adjusting your brakes to fine-tuning your derailleur, screwdrivers come in different sizes and shapes to fit various screws on your bike. You should buy a screwdriver tool set to get screwdrivers of all sizes in one box.
5. Pliers
Pliers are great for grabbing and holding onto things, like cables or small parts, while you work on your mountain bike. Whether you’re adjusting your brake cables or fixing a stubborn bolt, pliers give you that extra grip and leverage you need. They come in different types, like needle-nose or combination pliers, so you need to buy the right pliers for the job.
6. Wrench
Another go-to tool for tightening or loosening nuts and bolts on your mountain bike is a Wrench. It comes in different sizes to fit different bolts on your bike. Wrenches allow you to adjust your saddle height, tighten your pedals, or fix your handlebars. With a mountain bike wrench set in your toolkit, you’ll be ready to tackle any maintenance job your bike throws at you.
7. Chain Tool
If you ever come across a faulty chain on your mountain bike, you need a chain tool to fix or replace your bike’s chain. It’s like a mini vice that helps you remove or install chain links. It allows you to remove damaged links or adjust the length of your chain with precision. Every mountain biker should have a chain tool in their toolkit for those unexpected chain mishaps.
8. Scrubber cleaning gloves
Scrubber cleaning gloves are designed with scrubbing pads or bristles on the palms and fingers to clean a mountain bike properly. With them, you can easily scrub away dirt, grime, and mud from your bike’s frame, wheels, and components. You should buy a deep scrubber cleaning glove to clean your bike without worrying about getting your hands dirty or scratched up.
9. Cleaning brush
Along with cleaning gloves, you also need a cleaning brush to get into all the corners of your mountain bike to scrub away dirt and grime. You can use it to clean your chain, cassette, derailleur, and other hard-to-reach areas where dirt tends to accumulate. With a good cleaning brush set in your toolkit, you’ll be able to keep your bike looking and performing its best, ride after ride.
10. Tire Levers
If you come across a situation where you need to remove or install a mountain bike tire, you need a tire lever. It helps you to easily change tubes or fix a flat tire. Tire levers are typically made of durable plastic or metal, and they often come in sets of two or three. They’re an essential addition to any mountain biker’s toolkit.
Regular Mountain Bike Maintenance Schedule
| Frequency | MTB Maintenance Task | Description |
| Daily | Tyre Pressure | Check tire pressure. Inflate the tires to the recommended pressure and look for damages. |
| Saddle/Seat | Check if the saddle isn’t wobbly. Use allen keys and adjust bolts holding the seat in place. | |
| Bike Chain | Examine the chain for dirt or debris. Wipe clean and lubricate if necessary. | |
| Pedal | Check if the pedals aren’t wobbly or stiff when spinning. Adjust the screw according to your needs. | |
| Handlebars | Ensure handlebars are tight and straight. Grip the front wheel with your knees and try to turn the handlebars. They shouldn’t budge. If they do, tighten the bolts. | |
| Brakes | Walk the bike beside you at a slow pace and test each brake separately. | |
| Weekly | Suspension | Check suspension components for damage or wear. Lubricate suspension pivots if required. |
| Bolt inspection | Inspect all bolts and screws for tightness, focusing on critical components like stem, handlebars, and saddle. | |
| Bike cleaning | Thoroughly clean the bike including the frame, drivetrain, and components using a gentle cleaner and water. | |
| Monthly | Inspect Cables and Frame | Check brake and gear cables for fraying or corrosion. Replace worn cables or housing. |
| Inspect Bearings | Inspect the headset, bottom bracket, and wheel bearings for smooth operation. Clean and grease bearings as needed. | |
| Inspect Wheels | Check wheel trueness and spoke tension. Tighten loose spokes and true wheels if necessary. | |
| Every 3-6 Months | Chain replacement | Replace the chain if stretched beyond limits or showing signs of wear to prevent accelerated wear on drivetrain components. |
| Brake pad replacement | Check brake pads for wear and replace if necessary. Inspect brake rotors for damage or warping. | |
| Suspension Setup | Check suspension sag and adjust air pressure or spring preload. Inspect seals and bushings for leaks or damage. | |
| Yearly | Full Tune-Up | Take the bike to a professional mechanic for a comprehensive tune-up including adjustments, wheel truing, and component inspection. |
| Brake bleed | Check if the fluid is darker than its usual color. If yes, change the fluid. | |
| Suspension service | Have suspension forks and shocks serviced by a qualified technician. Replace seals, and oil, and perform internal adjustments as needed. |
Conclusion
If you have thoroughly read the article, you are all set to properly maintain your mountain bike. Just remember to follow each step and follow the maintenance schedule to ensure your bike is in full health and running smoothly.
Don’t worry if you have any trouble maintaining the bike on your first try. You will get better at every next try. A happy mountain bike means a happy bike rider. So, start your mountain bike maintenance schedule today, and happy riding.