
Ever felt like you are in a tug-of-war situation against your pedals? You are pedaling hard, but your bike barely moves. If you witness such a rhythmic imbalance with pedals, your legs demand justice. You need to know what is the right gear position and how to shift it accordingly.
What’s the big deal with gears? If you ask, shifting gears can be a technical challenge for a newbie – if you have not set your back for those rear cassettes yet.
The concept of shifting gear comes into existence to address your comfort, riding styles, and pedaling session. Today we discuss how to shift gears on mountain bikes, bumpy biking trails, steep ascents, or downhill rides. And also try to answer all your queries with all your burning questions on our FAQ section.
Types of Gear and their uses in mountain bike
Mountain bikes usually use two main types of gearing systems, the internal hub gears and derailleur gears. The derailleur gears are the combination of front and rear gearing which we discussed separately today.
1. Internal hub gears in modern bikes
The most common type of gearing system in modern mountain bikes is now minimalist, with, a single front chainring. You can see a wide-range rear cassette with 10-12 cogs, and comes with a rear derailleur, to help you select the needed gear ratio.
This simple 1x design has a wider gear range, efficient weight distribution, and pedaling experience than the older 2x 3x gearing system. The right gear ratio on varied biking terrain is the ultimate purpose.
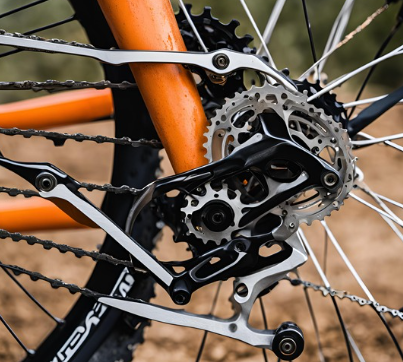
2. Rear gearing: The Real Cassette and Derailleur
Mountain bikes rely on the combination of the rear cassette and derailleur, which we call the rear gearing. On the back wheel, we see a part called the rear cassette, which has a combination bunch of rings or cogs attached to the hub.
These rings work together with the derailleur to provide a range of gear options when riding. You get to see one or two chainrings needed for the pedals for your every bike setup- be it road bikes or mountain bikes.
3. Front Gearing: The Chainring
Front gearing on mountain bikes depends on how many chainrings the bike has on the upfront, 1x, 2x, or 3x chainring system, based on your ride style. These are often attached to the crankset.
1x (One-by) System of front gearing focuses on pedaling without worrying about front gear change. This is simple and eliminates the need for a front derailleur but has mechanical issues as it was more of a traditional thing. If you want climbing, a 3x system of front gearing is best, for weight saving 1x or 2x does the job. A good all-rounder for riders can be a 2x front gearing system.
What are the essential types of equipment for gear shifting?
The essential equipment and components for gear shifting on mountain bikes are,
1. Chainring
The front chainring is an essential part of the bike’s gear system to help you pedal more easily. The number of teeth on the chainring can vary anywhere from 30 to 52 in modern mountain bike anatomy.
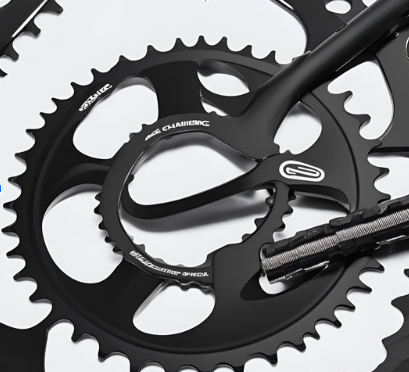
Here’s the cool part, the size of the chainring directly affects the gear shifting, more teeth mean a bigger chainring, which allows ease of down riding and adds speed on flat grounds. For uphill climbs, the lesser number of teeth does a smooth pickup.
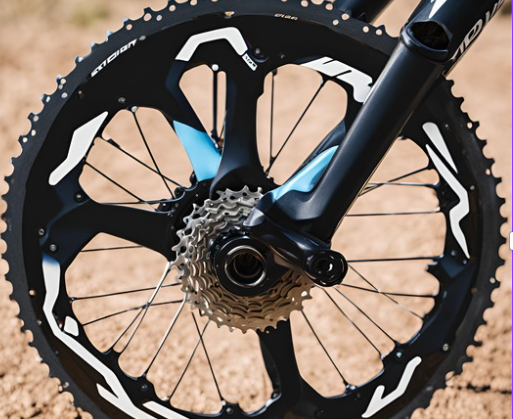
2. Rear Cassette
Picture this rear cassette, it is the stack of different-sized gears, multiple sprockets, and cogs, crucial for various riding conditions and terrain in mountain bikes. A bike cassette has anywhere from 8 to 12 gears, and the smallest gear has 11 teeth, larger ones can get up to 50, and a huge gear range, is possible with the cassette. It also enables a speed system with a precise gear ratio in mountain bike rides.
3. Front Derailleur
If your bike is a mountain giant, and you need climbing and a special gear shifter for different terrains, the front derailleur part allows shifting to front chainrings for steep inclines. The main body has an attachment to the bike frame, and it nudges the chain between big and small chainrings, often tighten with a screw.
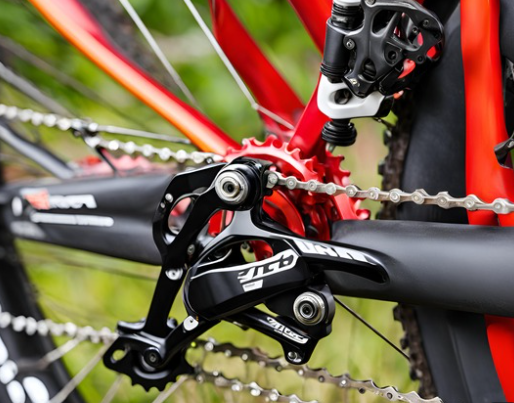
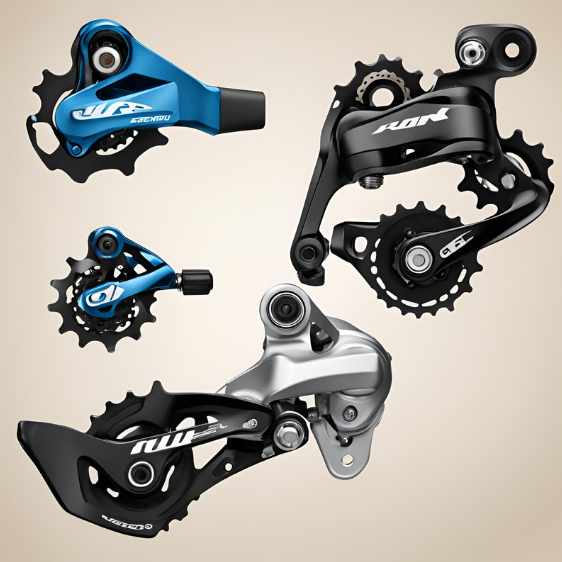
4. Rear Derailleur
The rear derailleur comes with spring-loaded arms responsible for moving chains and cables against the rear cassette. If a rider wants to shift gears without much friction to the chain and wants an efficient balance between lower and higher gear ratio, rear derailleur is essential equipment for gear shifting.
5. Shifters
The shifters from the rear and front derailleurs can be something new. Derailleurs denote the mountain bike component for shifting different chainrings on multi-speed bicycles,
It is attached to the seat tube of the bike frame. The right shifter has a relatively small amount of gear changer whereas the shifting technique is more relied on cadence on the left shifter.
The left-hand shifter moves the chain between chainrings on the crankset. The two shifter gears have sprung mechanisms, like a pair of jockeys in the wheel which regardless of the chain keep operating, with the loosening and tightening of the derailleur.
Other than this main component, necessary parts for finesse in gear shifting are chains, sables, and housing. If you want to ride a full suspension mountain bike and a hard trail, before that make sure you know the basic shifting gear knowledge on a mountain bike. It’s called finesse when you skillfully know when to shift gear for the skillful riding of the mountain bike.
Step-by-Step Guide to Shifting Gears on a Mountain Bike
Shifting gear is not an easy task for a beginner. If your legs are burning out on a mountain bike ride, it means you are stuck in the wrong gear. So, to help, here is our step-by-step guide on how to shift gears on a mountain bike ride.
Step 1: Know the right time to shift
Ever felt like your wheels are spinning but your bike is not going anywhere? This situation may arise when you are not aware of the necessary timing to shift or change gear in your ride. The key is changing gear before you are struggling or feeling awkward.
Keep an eye on your pedals, if your legs are churning faster, it’s time to shift lower gear because here you are barely moving. For smooth spinning, the crisp shift and power on the rear wheel need to match your pedaling needs.
On the other hand, if you are pedaling really slow and feel that you are trying hard to maintain a steady pace, it’s time to shift into high gear. But sometimes, it’s about the ideal situation “the sweet spot” and the right volume of pedaling, with the right gear.
Step 2: Use the right shifter gear for more speed
Here’s the fun part- learning when to switch gears. Want more speed? You need to use your right hand to shift up, it simulates the chain to jump onto a smaller cog at the back of your bike.
It’s some practice before you finally can master the right and left shifter. We have to get our heads, around the basics of the big rings up near your pedals (chainrings) and the smaller ones at the back (cogs). And yes, be comfortable enough with The LBS cycling shorts.
Step 3: Use left-hand shifter gear for an uphill steady climb
When facing uphill climbs in Step 3, grab your left-hand shifter to go down into an easier gear. A quick push will move the chain onto one of those bigger cogs at the back, making pedaling easier as you climb.
Shifting on steep inclines is about the right control. To incline upward in the hills, you must understand the rear shifter technique and be familiar with the lower gear technique. Push those bigger gears backward, and make pedaling easier. It’s advisable to switch the front chainring to a smaller one. Save your energy before you burn halfway, with the double-dipping technique and easy pedaling even in the case of multiple chainrings.
Step 4: Practice and practice choosing the right gear at the right time for every terrain
For newbies trying to figure out gear-shifting on mountain bikes, it can be a head-scratcher at first, until you track the right style of gearing, with both derailleurs. It’s terrible for grinding and crunching your gear without sufficient knowledge.
Don’t stump down hard on the pedals. For every terrain, you need to have a cassette with different gear options. The rear cassette is the one to work out your pedaling experience, in obstacles, flat ground, or downriding hills.
Switching smoothly can be way more fun only after a series of practices and experiences. Especially on rough trails, knowing how to switch gears on a trusty steed is essential to navigating the bumpy path with ease. For better performance, you can also shop for custom gravel wheels with rims.
How is gear shifting done in four planes of movement in mountain biking?
Every mountain bike ride is different and needs different gear-shifting options. Here we discuss how gear shifting is done in four planes of movement in mountain biking.
1. Forward and Back (Sagittal plane)
When pedaling forward in such movement, you shift to harder gear first. The constant momentum between larger chains and smaller cogs helps you maintain the speed of your mountain bike.
When pedaling backward, means when braking, it’s an easy gear shift from small chainring and larger cog. This gear shift in mountain bikes in backward movement is fone to reduce the resistance.
2. Side to Side movement (Frontal plane)
The frontal plane has side-to-side movements, so, “what kind of gear shift is done for this motion?” The mountain position needs to lean here for the frontal plane and this is not directly related to gear selection. However, here is a technique, look for balance and control if you have side-to-side movement for hills or inclines. You may need more cadence and power with the requirements of easier gear.
3. Up and down movement (Transverse Plane)
Mountain biking on up and down movements, i.e. ascending and descending requires a different gearing technique. When climbing the biker needs to rise out of the saddle to shift an easier gear from a smaller chainring to a larger cog. This is done to turn the pedals with less effort.
Comparatively, when a rider wants to descend or ride down on a mountain bike, there is requirement for a harder gear. There needs to be a balance between the speed, and rider’s control in riding position, without spinning out the wheel too much.
The upshifting motion is the harder gear and the downshifting motion of the chainring is the easier gear. This is solely differentiated based on gear ratio, torque, and climbing power.
4. Rotational Plane
The derailleur hanger alignment in a mountain bike allows for smooth gear shifting. On the rotational plane, there is a single plane movement between the different-sized sprockets (cogs) on the cassette (rear) and chainrings (front). There is a positive gear ratio to mitigate the risk of interlocking on a flat rotational plane. Additionally, you can also purchase XLAB Gear Box, from the LBS outlet or online.
Pro Tips for Mountain Gear Shifting
Mountain bike gear shifting is more complicated than a car, but it can get tricky if you are unaware of how each side of the handlebars function. Here are some pro tips on how you can have control of your gear, and the chain movements across the cassette.
Tip no 1: Change gear like a pro, but first, look if the pinch bolt is nice and tight
To prevent any sort of havoc on your gear-changing needs of the bike, look for that pinch bolt. See if it is nice and tight. This ensures proper alignment between the chain, cassette, and derailleurs, to find any difficulty beforehand of your ride. A loose brake caliper pinch bolt also impacts your gear and stopping power, so mitigate risks by checking in advance.
Tip no 2: Find a sweet spot for smooth gear shifting with experimentation
Before you hit the mountain biking trails, take a few seconds to cross-verify your sweet spot. Experiment with the right distance between big chains, and see if they are up close. Adjust the screws and see if your body is in a comfortable and good posture on every gear needed.
Tip no 3: You can get a nice noise when the chain is clean and lubed
Don’t forget to clean and lube your chains if you want that sound of perfect gear switching. Apply grease after a nice scrub and rinse session with the chain and cassette. Get the best-selling cleaning tool.
Tip no 4: Learn to use the trim feature
The trim feature is available for the front derailleur of the bike. It is a minor adjustment in the position of the derailleur cage that prevents the chain from rubbing against the adjacent chainring using certain gear combinations. You can learn to use the trim feature for a wider range of gear performance, for that,
- Identify trim positions either outboard or inboard and adjust with a screw or lever.
- Pay attention to every gear shift to eliminate the unwanted chain rub.
- Move the derailleur to trim positions before the main shift on your riding day.
Tip no 5: Avoid cross-chaining
Cross-chaining is the gear combination where the chain is running at a sharp angle with the engagement of more teeth. This suggests a diagonal position between the smallest/largest chainring and the smallest/biggest cog on the rear cassette.
Cross-chaining can cause mechanical losses and wear to the gearing system. It is one of the main issues that can occur is smooth shifting between the gears.
- Always the tips remain, for one to stick at the middle range of chainring when shifting the gear.
- One shall avoid the extreme small-small and large-large combinations.
- Shift the front derailleur first before shifting the rear derailleur and do this every time at an optimal angle.
- Monitor your gear selection to avoid the chain getting too far in alignment with the chainring and cassette.
Conclusion
With these tips in mind and a little practice, you can learn about the right time to shift gears. This will allow you to understand the basics of a smooth ride. So, get out there to ultimately follow these easy steps to switch gears and be a gear-shifting pro in no time. Hit the mountain bike trails with the right gear and support from our local bike shop community. You can also shop for mountain bike headwear, apparel, frames, toolkits, and premium bike components with the LBS.
FAQs
1. How do I adjust the rear derailleur for optimal gear shifting?
For optimal gear shifting, adjusting the rear derailleur for both high and low limits in the opposite direction adequately is a key point. Professional suggests the high limit to shift the smallest cog, to tighten “as far in the direction from the wheel”.
Now for the lower limit, the ”L” screw, we do the exact opposite. You want to actually make rear derailleur near the rear wheel, without actually touching both. These tining adjustments, make your gear shifting process, “much more better.”
2. What are the best practices for using bigger gears on mountain bikes?
As a mountain bike rider, you need to adapt to different terrain and riding conditions for optimal riding performance. If you talk about best practices in bigger gears, it’s all about the timing of the shift just before an incline and pedaling lightly. In addition, the rider looks forward to avoiding excessive load and regularly maintaining their drive train after every ride.
3. How does the front chainring impact overall gear performance?
The front chainring has an overall impact on the gear ratio. Whenever a rider changes the front chainrings it affects the gear range, the larger the chainring more is the gear ratio, and those who prefer uphill climbing usually get one shorter for an advantage in inclining. But for downhill comfort, larger chainrings are much easier with a higher gear ratio.
4. What are the signs of a worn-out rear derailleur gear?
Worn-out rear derailleurs in a gearing system have small pivot points, shifting issues, and increased play of cage and pulley. In addition, the excessive movement or malfunctioning of the cage and pulley of the derailleur can pose a risk before it’s worn out. If you notice early signs of wearing out on chain tension and alignment, get it checked so that, you don’t risk your life in gear or brake failure, which can be simply avoided with regular inspection.
5. How did gears evolve over time?
Early gears were started as early as the 3rd century BC, with a more simple wood design. Spur gear is the oldest mechanical gearing system in mountain bikes originating as old as the 27th century BCE. According to The Collector, it was first in use in the Chinese South-Pointing.
Modern mountain bikes do not necessarily use spur gear as an essential coming to today. It was the basic type of gear discovered, they were more simple and inexpensive. The parallel straight teeth were noisy operating perpendicular to the gear face. Because of its noisy drawbacks, it led to the further discovery of a noiseless rear derailleur.
Such a gear was used in water wheels, early clock and the direct was rather reverse and rotational. It is major used in industrial applications. After this comes the discovery of helix pattern gear on industrial machinery, worm wheel (angled gear) for gear ratios. Rack and pinion gears were also in existence which gave the concept of conversion between rotational and linear motion.